🔨 Cut with Confidence - Elevate Your Craftsmanship!
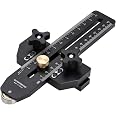
The KREGKMS7102 Table Saw Precision Miter Gauge System is a premium woodworking tool designed for accuracy and versatility. With features like 5 positive stops and a patented swing stop, it allows for quick adjustments and repeatable angled cuts. Made from durable materials, this miter gauge is perfect for both professional woodworkers and DIY enthusiasts looking to enhance their projects.


| Brand | KREG |
| Color | Blue |
| Blade Material | High Speed Steel |
| Surface Recommendation | Wood |
| Power Source | manual winding |
| Special Feature | 5 patented bar adjusters, patented Swing Stop |
| Included Components | Miter Gauge |
| Product Dimensions | 24"L x 24"W x 5.5"H |
| Warranty Type | Limited |
| Item Weight | 6 Pounds |
| Blade Length | 24 Inches |
| Blade Shape | Rectangular |
| Global Trade Identification Number | 00647096521127 |
| Handle Material | Aluminum |
| UPC | 785497050966 772040301583 647096521127 721019584007 745667216639 732454078327 |
| Manufacturer | Kreg Tool Inc |
| Part Number | KMS7102 |
| Item Weight | 6.02 pounds |
| Item model number | KMS7102 |
| Is Discontinued By Manufacturer | No |
| Material | Metal |
| Item Package Quantity | 1 |
| Number Of Pieces | 1 |
| Special Features | 5 patented bar adjusters, patented Swing Stop |
| Batteries Included? | No |
| Batteries Required? | No |
| Warranty Description | LIMITED |
C**T
Easy to use and assemble
I needed a better tee square for my table saw. I looked at ones that cost a lot, but I purchased this one it is very accurate and easy to use, and fits any table saw that has the slots in the table top. And the price did not break the bank.
P**M
Excellent Kreg Quality and Accuracy
WOW! What a nicely made item! You have to put it together. There are like four small bags of parts, some of which you may not need, depending on your saw table. There are a couple of extras of some of the plastic parts. The instructions lists exactly how many you need and you only use them on the single step involving them. You might have extras. They will not be used later on in the installation. You did not miss anything. ;-) The "fence stop" parts are shown in the instructions in a manner that allows you to clearly see how they are assembled, but the instructions never mention where they go; luckily, the box has some excellent information and photos. There is a small part on the "Swing Stop" (the "support button") that is a tiny bit too thick, preventing the Swing Stop arm from fully doing what it needs to do. I found that I had the Nylock nut too tight. Once I backed off on it so that it moved as per the instructions, the support button was only a very minor problem. Perhaps buying a small, brass or teflon washer sized to match the two brass ones in the kit (and maybe half as thick, hence my suggestion for teflon) would make this fit perfectly. The self-adhesive rule is METAL, so the instructions to use strong scissors or snips is something you should heed. I used scissors, large ones, and may need to sharpen them after doing this. You get a four foot section of this rule and you cut it at 1 and at 25 and it fits just about perfectly. The trough it runs in needs to be cleaned first with an alcohol swab (or whatever) to degrease it. The trough is exactly the correct depth, but there is a little bit of wiggle room from top to bottom, so peel off about six inches of backing at a time, press the rule against the far side and then press it flat a little at a time. Then your rule will be perfectly aligned. (This is totally not important. I am just OCD when it comes to being as precise as I can with stuff like this.) The four "glides" that are installed into the fence arm are TIGHT. I had to press hard to get them started and then tap them in with a tack hammer to get them fully seated. They look like they could easily fall out or move; they won't as the fit is snug. The little lens came in a small ziplock baggie. The other parts were in sealed bags. I saved the ziplock baggie for the unused parts. (The main unused parts - for me - were a T-guide for the track bar. My table has a 3/4" slot with straight sides. Some have a T-guide to lock the attachments in place. This kit comes with a T disc and screw for the track bar that I did not use. Since I may purchase a new table in the near future I decided to save these along with the extra nylon adjuster pins and glides; I might want them later. The brass lock pin was missing in my kit and I was sort of pissed off about that. Then I took the thin, plastic tray out of the box. It has fallen out of its little cubby during shipping. It is the only LOOSE part on this device. You need to make sure that however you store this that this pin does not disappear on you. It fits snugly, and if you sort of torque the two fence and guide together a bit and then lock the protractor down the pin stays in place well enough. Excellent product. I like Kreg stuff and will buy more. Easily as nice as the Incra, perhaps nicer. Recommended!
A**E
Novice Point of View
I've been wood working off and on for over a year; shelves, bookcases, tables, raised platform etc. I'm by no means the next Bob Villa, but I do own basic tools including a DEWALT DWE7480XA table saw. I originally made my own jigs out of wood; one for cross cuts and one for 45 degree angle which worked very well, but unfortunately because I work out of a plastic shed I'm prone to getting termites on the untreated wood. I wanted to get something to replace both sleds that wouldn't attract bugs and this did the trick!Assembly was a bit more complicated than I thought it was going to be. You can install it on the left or right hand side of the blade, if you install it on the right hand side the measuring tape gets turned around and the stop gets assembled differently.I use this on the left hand side of my blade so I followed the instructions in the manual (which state they are for left side install,) however something to note is the pictures of the stop being assembled are for being used on the right hand side so you'll want to switch it around. The clear plastic magnifier lens is a pain to install on the stop and I didn't realize I had assembled the stop wrong until after I installed the magnifier lens and I had to use a mallet to hammer it back out again.The instructions say the trak bumpers are white, but they are actually black, I only installed 2 of them, one on each side of the bottom of the fence. You have to push hard to install them and then I gently hit them with the mallet for good measure.You may have extra pieces depending on your install; I don't have a t-trak so I have the double stacked washer, screw, 2 nylon adjusting screws (which are extra), and 4 bumpers (that I didn't install) left over.The construction is very sturdy, it's heavy, and easy to use. I like that there is a metal pin used to hold the degrees, the position stop allows for quick adjustments and the stop is very helpful. The instructions, while not completely correct, are still helpful in fine tuning the jig to fit nicely. Something to note is I started all the threading by hand first, because some pieces are made from nylon. If it's not going in smoothly back it out and try again or grab one of the extra nylon adjusting screws.My table saw top is a bit small and with this being so heavy it starts to tilt. I hope to remedy this when I make a work table with my saw set in it. For cross cuts I'd highly suggest installing a sacrificial fence. You are told to break a piece off the stop if you do this, but I'm not certain what happens if you don't, it seems like it would still work as a stop, but perhaps not hold the wood piece down as tightly.I made rabbets using this and it made the work go by quickly. I don't think this tool is a must have for every shop and if I didn't have a bug problem I wouldn't have purchased it, but I think it will serve a good purpose for my needs.
G**.
Quality, precision miter gauge
The main issue with this miter gauge is the adjustment system for the bar that runs in the groove of the table saw. It consists of a few nylon screws that can be adjusted to take the lateral play out of the bar. If you have a smaller table saw (I have a DeWalt with an 8 1/4" blade), the miter gauge frequently will need to be pulled far back to accommodate a larger piece of wood. When the it is that far back, there is considerable lateral wobble until it is inserted further and the next nylon screw engages the groove. A better design would have been an expanding bar that is the correct width regardless of insertion depth.A second issue is not really a problem with the gauge itself, but rather something people with smaller saws need to be aware of. As I said, on a smaller saw with a larger piece of wood, the miter gauge needs to be pulled far back before beginning the cut. Due to the width and heft of the gauge, it will want to tip to one side. Taking these two issues together, when cutting a larger piece of wood on a small saw, you will need to work hard to keep the piece square with the cutting fence until the nylon screws engage, while simultaneously preventing the gauge from tipping to one side. It can be done but takes some practice.Otherwise, the gauge is a quality instrument. I have no regrets about buying it.
Trustpilot
4 days ago
1 month ago