


📷 Capture the Past, Embrace the Future!
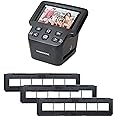
The Magnasonic All-In-One 24MP Film Scanner is a user-friendly device designed to convert various film formats into high-resolution digital images. With a large 5'' display, built-in memory, and no need for a computer, it offers a seamless way to preserve and enjoy your treasured memories.
| Item Weight | 1.3 Pounds |
| Minimum System Requirements | Windows 7 |
| Color Depth | 24 Bits |
| Standard Sheet Capacity | 20 |
| Connection Type | USB, HDMI |
| Resolution | 24MP |
| Wattage | 5 watts |
| Supported Media Type | Negatives, Slide, Photo |
| Scanner Type | Film |
J**J
Picky photographer says: amazingly good for the price, much faster than traditional scanners
This is a great scanner for the price. I tested it on various slides, on different film types, too light or dark, with a color cast, etc. I'm a picky photographer. The scanner automatically brightened a dark slide to be exposed properly without being "blown out" (totally white), but overexposed slides came out dark; again, I used a photo editor to fix the image. I only scanned a few color negatives, so I can't comment in general... but one underexposed negative (which should be too dark) scanned too light, with no true black. So, again, a photo editor is your friend for improving some scans.The images from slides were very sharp. I could see the film grain in the scanned image.The cable is fairly short. You might need a longer USB-A to mini-USB cable. The unit gets power from the USB cable. If you don't have a computer, you'll need a mini-USB power supply brick that plugs into a wall outlet. (This means you can use the scanner on a laptop.)The scan was almost instant. (Unlike other film and paper scanners I've used, there's no light/scan bar that moves across the image.) From a 35mm slide I got a scan file 6000x4000 pixels, 6.2 MB file size. (The 6.2MB will vary depending on how complex your original photo is... that's how JPGs work.) A bit of the edges were cut off, but this was usually fine.The color adjustments are in steps and a bit coarse (0, 0.5, 1.0, etc.; you can't pick a value between). They worked pretty well for big changes, but I preferred a photo editor and a computer screen. You'll need to understand that these three settings -- red, green, and blue -- can be negative to add the opposite color. For instance, yellow is the opposite color of blue. If the image is too yellow, you can't reduce yellow; you have to increase blue. If you don't want to fiddle, your photo editor probably has a "fix color" setting you could try on the saved image. Note that the scanner "remembers" the previous color adjustment... if you don't want that, reset each color after you finish one slide or you capture the next slide.The single negative holder is really frustrating because it doesn't hold a strip of film tightly... so, as you try to put the film strip in the holder into the scanner, it can shift and make the scan off-center. I've ordered a negative holder that holds a whole strip of six photos; that should be a lot easier!Tip: You don't need to open the single slide holder to put a slide in it, then close it. Instead, while the holder is closed, try pushing the slide in from the left end, as in the photo. To avoid touching the film (which will make a fingerprint that can eventually eat into the film!), use your fingernail to scoot the inside of the slide mount left and right.Vertical photos have to be turned to go into the scanner horizontally. I rotated them with the lossless JPG rotation in the amazing free Irfanview app... or you could open the image in a photo editor, which takes a bit more time.On my Windows 11 desktop, when I went to "Connect to PC" on the scanner menu, the File Explorer app opened. It (in this case, the F: drive) showed the photos in the scanner memory. You'll need to transfer the photos yourself if you want to keep copies after you unplug the scanner. If you aren't familiar with File Explorer, you can probably use another app that copies the photos for you.Kodachrome slides scanned just fine. (Kodachrome is a problem on some scanners.)To help avoid dust spots, insert the cleaning brush through the slot once in a while (dust wasn't a problem for me, though). After you line up the film in the holder but before you put the holder into the slot, use a can of compressed "air" to blow away dust (invisible or visible). If spots bother you after you see the scanned image on a computer screen (where it's much easier to see the spots), use something like the Healing Tool in the powerful free GIMP editor (gimp.org).If you don't line the film up exactly, the scanned image will have a black bar at one side. I had to move the slide holder while it was in the scanner to get rid of the bar. Luckily, after pressing the Capture button, the image on the scanner screen is "live": As you move the slide holder left and right, you can see the black bar disappearing. A scanner like this will be designed to cut off a bit of the edges so you normally won't see a black edge on any side (which would be caused by scanner scanning some of the opaque cardboard slide mount).Some cardboard slide mounts were too thick to fit in the holder easily. A lot of the slides were too thin; they shifted left and right as I handled the holder... I had to carefully hold it flat as I put it in the scanner.Tip: I scanned an underexposed negative, which should come out dark. But the scan was too bright: a bit "washed out", with no true black. I opened the scanned negative in a photo editor and checked the amount of red, green and blue in the scanned file; it didn't have any true darks. (The photo editor's histogram shows this: the left side of each curve, which shows how much of the darkest shade of each color is in the scan, shows no dark colors.) I used the editor to "drag" the left edge of each curve to span the whole width; that improved the scan a lot. (Note: don't just turn down the brightness in the editor because you'll probably lose the brightest colors. Spread the histogram curve so you'll have dark darks and bright whites.) I've included the original scanned photo and the one darkened with my photo editor.Overall, for the price -- even with irritations like trying to align the film in the holder -- this scanner is amazing.
L**C
Works well, only one issue
Seems to work well. I like that you can put the slide tray in and then just push slides through it without unloading it each time. The only downside is that it seems to have an auto backlight/brightness adjustment, so when you put dark pictures in (like pictures outside at night) the backlight intensity flutters trying to adjust. It only happened on a handful of slides, so not critical.
L**B
Easy to use, negatives to digital images in seconds - good quality - well worth it
This is the third film to digital scanner I've purchased, and it is the best. The others worked, but not easily and I always had problems. This unit has a nice display to show you where your alignment is and it captures good quality images from the slides. It is a nice size, not too big, not too small. You'll need to remember to check for dust and clean it, but that is simple with the supplied cleaning stick (or a can of compressed "air"). I highly recommend this unit for home users - professionals may have different standards, but it certainly would work for their proof sets.
A**R
Easy digitizing film treasures
Does exactly what is described! I have transferred 35mm slides using this and had no problems. I recommend!
J**E
Great Quality, Easy to Use
Got this for my mom. It's been easy to use and she has been able to print out lots of pictures! Great quality, easy to use!
M**A
50% Unusable DOA defective. Menu on screen, then shuts itself off. Second scanner partially works.
First scanner screen lit up, showed the menu, then promptly shut itself back off. Unusable DOA defective.Replacement shipped by Amazon was less unstable, so it could be used to scan negatives and slides to SD-card. The 'upload to computer' mode is still not stable.
E**R
good product
Worked very well for scanning old 35mm slides, but only designed for horizontal pictures. Verticle pictures are cropped off unless you scan in the horizontal positon and then rotate the scanned pictures 90 degrees with photo editing software. But, you get what you pay for, for the price it is quite adequate for scanning.
T**S
Better than imagined
Light, fast and does the job better than I could have hoped.
Trustpilot
1 week ago
3 weeks ago


![SanDisk 128GB Ultra SDXC UHS-I Memory Card - 120MB/s, C10, U1, Full HD, SD Card - SDSDUN4-128G-GN6IN [Older Version]](https://images-na.ssl-images-amazon.com/images/I/81L9+ucpSdL._AC_UL116_SR116,116_.jpg)