


RolifeMiniature House Kit for Beginners-1:20 DIY Miniature Dollhouse Kit with LED Lights-Tiny House Crafts for Adults-Birthday Gifts Hobbies for Women and Men

Description
✨ Build, Create, and Illuminate Your Imagination! ✨
- IMMERSIVE FUN - Dive into a world of miniature magic and peaceful crafting.
- CRAFT YOUR DREAM - Unleash your creativity with this engaging DIY project!
- QUALITY MATERIALS - Constructed from premium wood, paper, and plastic for lasting enjoyment.
- PERFECT GIFT CHOICE - Delight friends and family with a unique, hands-on experience.
- STRESS FREE ASSEMBLY - Enjoy a simplified assembly process with detailed instructions.
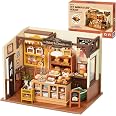
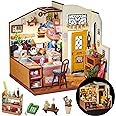
The Rolife Miniature House Kit for Beginners is a 1:20 scale DIY dollhouse featuring a charming baking house theme. Designed for adults and older kids, it includes LED lights and a simplified assembly process with high-quality materials. Perfect for gifting or personal enjoyment, this kit promises hours of creative fun.


Specifications
| Item Dimensions L x W x H | 8.5"L x 7"W x 7.5"H |
| Size | 8.5×7×7.5inch |
| Style Name | 2.Becka's Baking House |
| Theme | Baking House |
| Color | Multi-color |
| Material Type | Wood |
Reviews
M**D
Great for your first time
This is the third of these miniatures I have constructed. This was definitely my favorite to put together. Everything is perforated and fits perfectly. The parts weren't as teeny tiny to put together and absurdly impossible to glue as others I have done. It's really, really cute.
R**E
Fun pastime
So, I’m very new to this. I like to build Legos but wanted to try something new. This was fun. It took a little over a week because some days I didn’t work on it at all. I didn’t use the glue that was provided. I used my own tacky glue instead. The quality was great compared to another kit that I tried to do. This one was a lot easier to work with. The only complaint that I have is trying to do the wiring. The wiring was a little hard because the wires are so tiny and fragile. I used an exacto knife and nail clippers to strip the wires. Overall I think this fun to do even for a first time builder.
L**G
Beautiful project!!
Lots of very small parts which was a wonderful challenge! It was tremendous fun to complete! Turned out beautifully. My grandkids are fighting on who gets it so have to do another!
C**L
Fun miniature to build! Medium level if you’re just starting
The media could not be loaded. Tip!! Read through the entire manual and make sure you have all the pieces first!This was my first miniature and I really enjoyed it. Thoughts below:Pros:• Labeling made sense and was very clear to understand• Build quality is really solid• No missing pieces! I was actually given a few extras• Such a cute build and the various colors of wood were really nice to see and work withCons:• Most of the assembly was easy-medium, and this was a laborious endeavor. This is not a weekend project, unless it’s ALL you do that weekend LOL• Some pieces require a little sanding (which they provided in the kit) but you won’t know until you know• The glue gets really tacky and is difficult to use if you’re not used to craft glue. I bought my own, which was a little easier to use• The wall structure popped out frequently with the door, but again, it’s something that can be glued down once finished and fully assembled
M**R
Confessions of a first timer
My first time making one of these kits. I'm male, 51 and "handy" level of maybe 7/10. It took about 10 hours over two days of hands-on work and looks generally like it's supposed to so I'm pleased overall. I had fun doing it and believe this set is good for beginners, although it's helpful to know how to rig things if something goes south and you will benefit from steady, high dexterity/thin fingers or a good set of plastic tweezers (not the cheap ones that come with the kit). It may not be something suitable for a parent/child togetherness activity, although this kit is on the easier side.As a newbie with little innate knowledge, directions and consistency of labeling and being able to find the proper parts to assemble is key. I found this kit ranked highly here and had easy to follow directions from start to finish. Just take some time before starting to review and understand the logic, it's part of the journey.- You will need a lighted magnifying glass at any age as signage is tiny and you don't want to get it upside-down. Also a metal ruler to guide cuts, and a clean x-acto knife to make them. I found some metal clothes pins to clamp a couple of things while glue dries came in handy.- The glue that comes in the kit is difficult to use as you need to heat and attach a nozzle to the bottle. I burned my fingers and made huge a mess of the nozzle, fortunately I had other white craft glue so threw away the glue that came in the kit. Good "craft" tool kits are available on amazon for $8-12 with craft glue also in the $10-$12 range.- There is plastic film on one of the part "cards", I threw it away but it needs to be saved to cut and make bags for loaves of bread. It does say this in the directions, but I didn't see until too late. I tried cling-film but it was a mess. Because of this, the placement of some of my food items differs from template and the breads are not in bags- I glued everything down since I won't be "playing" with it. Not sure if we're supposed to or not and this might be a major faux pas for the purists. I also glued most of the parts together during assembly - it didn't say to very often in the directions but felt it was necessary. It's not as "click together-simple" as implied by the marketing video- The light fixture should have come assembled and wired, leaving only the battery box connection. I get that it's a DIY but stripping wire shielding to expose a wire the thickness of a human hair (and not cut through the whole thing) is challenging and frustrating. Then wrapping the stripped hair-wires around two ends of a tiny LED to connect and THEN using heat-shrink tubing to suck it all together was an exercise in futility. It's too much and does not add to the project. You need the magnifying glass to determine the direction of the bulb polarity (matching the bulb insides to the bulb diagram in the instructions). Despite all the electrical issues and frustrations, my bulb lit up the first time when tested- I recommend a glue stick for the wallpaper as craft glue ridges can be seen through the thin paper used for the walls. Most walls get covered up so I won't lose sleep over it. Glue stick glue can't be adjusted as much after placement as with craft glue but will look smoother.- Sometimes you apply paper to both sides of a wall board (a wall that has both interior AND exterior designs). When you're applying the second side, the underside that you finished is upside-down on the table. Use a virgin surface (like a fresh piece of printer paper) below this as any residual glue or debris on the surface will mark your freshly wallpapered side while you're applying the other side. I had to use my own paper (a design printed from the Internet) to cover up a piece that got damaged- This set does not come with any dust cover so I will be spending 2x the kit value on a custom-sized acrylic box to put it in. Access to the light switch will not be possible as the cord to the battery/switch is not long enough to extend to the floor (and outside the box)- In case you were wondering (I was) the light is not a "Clapper" responding to a snap like the video demonstrates. It's a standard toggle switch on a battery box that goes into a hole in the back wall for access. It would be handy if it was - especially when put inside a caseEnjoy!
V**A
Favorite for keeping me busy ☺️
These are my favorite for when I’m bored or just want to keep myself busy and get something adorable out of it.My husband gifts me many of this collection since I started to build these in South Korea. Price is good and it also brings all the tools you need.Take your time, don’t rush it and you won’t get any weird warping or wood cracking. It’s VERY easy to build, sometimes some pieces are a little bit loose but add some glue and it’s good to go, nothing crazy.
Common Questions
Trustpilot
2 weeks ago
2 weeks ago
