


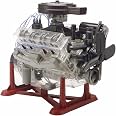
Revell 85-8883 1/4 Visible V-8 Engine Plastic Model Kit, 12-Inch,Multi-Colored
Details
- BrandRevell
- Age Range (Description)Adult
- ColorMulti-Colored
- Item dimensions L x W x H29.13 x 16.93
- MaterialPlastic


Description
🔧 Build, Display, and Dominate the Hobby Scene!
- PERFECT FOR DISPLAY - A striking multi-colored design that makes it a centerpiece in any hobbyist's showcase.
- ENGAGE YOUR CREATIVITY - An ideal project for both novice and experienced builders, sparking creativity and technical skills.
- VERSATILE COMPATIBILITY - Designed to work seamlessly with a wide range of RC models, enhancing your collection.
- GLOBAL QUALITY ASSURANCE - Sourced from top-tier global producers, ensuring premium quality and durability.
- UNLEASH YOUR INNER ENGINEER - Craft a stunning 1/4 scale V-8 engine model that showcases intricate details.
The Revell85-8883 1/4 Visible V-8 Engine Plastic Model Kit is a meticulously crafted model that measures 12 inches in length. It features parts sourced from global producers, ensuring high quality and compatibility with a variety of RC models. Perfect for hobbyists looking to enhance their skills and showcase their work.

Have a Question? See What Others Asked
Reviews
D**N
Fun to Build
I’m an old retired mechanic. I have been wanting to build one of these for a long time. I finally got the time to do it. I was very patient. I spent the first day, (about 6 hours) just trimming parts and looking through the directions. It took another 3 days, or so, to complete. Some pieces MUST be allowed to dry thoroughly before proceeding.Most of the parts fit very well. However, some pieces need to be ‘shifted/pushed’. Its wise to pre-fit, and understand how everything is going together, and, some temporary assembly is also helpful. The finished engine looks very good, with some mis-alignment where the water pump matches up with the heads; mostly caused by slight warpage in a front clear piece. Its minor to me.The box recommends paint. But I think that is an error. This model looks great without painting. Instead of adding detail and realism, I believe painting just distracts from the purpose of this model. (Having said that, there are exceptions. Some of the pictures other builders have uploaded, are impressive.)I used Canola vegetable oil, It seems to be working fine. You really need to be careful to clean the oil off the end of the rocker arm shaft, before gluing the cap on. And then work that closest rocker arm back and forth, to be sure no glue is stuck to it. (OR, just lubricate it after gluing.) DON”T apply oil to the cylinder walls. It is not necessary, as the pistons are a loose fit. The oil will just cloud up the view.I used Testors Clear Parts Cement where it said to use epoxy. I think the clear parts glue worked very well. It takes longer to dry, but it also gives you time to clean any glue from the threads, and you can even install the screw, and tighten the nut into the hole, getting it perfected centered. AND, it dries clear.The screws and nuts in my kit were nearly perfect. The sole exception was putting the screw through the generator bracket into the thermostat housing. I had to enlarge the hole opening a little bit, then it worked.It is a copy of an old small block Chevrolet. (Although, you can modify it to look like other engines.) If you assemble it correctly, the valves and pistons are in correct ‘time’. HOWEVER…some fool put the rotation direction on the bell housing pointing in the wrong direction. The engine actually turns clockwise…looking at it from the front. (The same as a real engine.) It doesn’t hurt to turn the wrong direction, its just that the valves work backwards then.It has great detail, and a lot of parts. I actually would have liked to have seen even more detail. Such as, a timing chain, camshaft bearings, a rotating distributor shaft, and a clear distributor cap. They also need to include spark plug wire looms. My pictures do not show them, but I have some split wire wraps on the way from Amazon. That should make the wires look better.Interestingly, if you build this correctly, some of the important items can be disassembled. You can add oil to the parts, or even swap out pistons, heads, etc.I don’t really see this as a great father/son project. This is a model you will need to concentrate on. (I believe this is the same, or very similar to a model engine that I tried to build 45 years ago…and failed. If my memory is correct, I gave up after messing up installing the nuts. I had them crooked, with glue in the threads. But, back then, we didn’t blame others, for our own failures, like I see many reviewers here doing.)
S**S
Wife wants to know.
I bought this for my wife for her birthday...lol. She is always asking me about how a gasoline engine works and what are the parts. She was so excited when she opened the present and thank me as if I bought her a diamond ring. My wife was has great mechanical ability and loves a challenge. This will keep her busy and informed and she won't be asking about how an engine work anymore.
A**R
Great Product
The media could not be loaded. Got this for my husband for Christmas because he loves working on cars. This is a good alternative to the real thing which is way more expensive. He finished it in a week! No issues. Just need to get your own glue and oil.
0**4
Minor issues but still enjoyable
To be honest I was very apprehensive about purchasing this kit after reading all the reviews but I decided to take a chance and our 10yo and I completed the kit last night. All-in-all it wasn't a bad kit, it just needed a little attention to detail. After reading the reviews I decided to purchase a few things to prevent some of the common issues. There was mention that the screws and nuts were now metric and did not fitting correctly so I purchased some SAE items to replace them (#2-56 hex nuts, #2-56 1/2" screws and #2-56 1/4" screws). I also purchased a needle file set, Labelle 108 plastic safe oil, and a starter kit that included sandpaper and a razor knife. As stated in other reviews there is a lot of "flash" or extra plastic on many parts that will need to be cleaned up, that's where the file set came in (good investment!). Use sand paper on the round parts because the molding seams will hamper the rotation of the engine. As far as fitment, you need to test fit everything several times to make sure it fits right. We found some issues when putting the actual engine block together, I had to trim off the locator blocks from the front and rear pieces with a knife because they were hitting the cylinder parts and wouldn't let them sit flush which really messed up the fitment of the crank and cam shaft. No real issue to doing this since the parts attach with screws anyways. Other than that just some minor adjustments here and there to get everything to fit and operate smooth. The kit was missing one piece (a bearing cap), but using the Revell order page we had the replacement in about a week (free). The only other deviation we did was we used super glue in place of the epoxy; but if I had to do it again I would just use the standard fast drying plastic cement for all parts, super glue tended to haze the clear parts. As far as an educational tool I think it was outstanding. The kit comes with a "How engine's work" book which we sat down and read to start off. During the build I would explain exactly what every part was and what it did. The next day I would point out parts and have him tell me what they were and what they did. It took us about three weeks to complete working and average of 1 hour after work and usually 5 days a week. Would I purchase the kit again? Absolutely yes, very enjoyable to put together and he can't stop talking about it to family and friends...and he learned something in the process. The kit just takes a little patience, some modeling skill and maybe to some degree a little working knowledge of engines. I gave it 4/5 stars simply because of the small fitment issues and flash but the model is working smooth so far.
J**F
Excellent!
👍👍👍
D**G
Poor quality. Parts missing.
Parts don't fit together very well, requires some custom fitting, missing a couple of parts, a couple more were broken in box. I enjoyed the engine build but the quality of this model is lacking.
Common Questions
Trustpilot
3 weeks ago
2 days ago
