


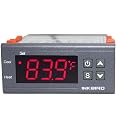
InkbirdTemp Control Thermostat ITC1000 Dual Stage Digital Temperature Switch Controller ℃ ℉ Display Heating Cooling Relay NTC Sensor 3D Printer Freezer Fridge Hatching 110 Volt
Details
- ColorGrey
- BrandInkbird
- Voltage110 Volts
- Product Dimensions3.93"L x x
- Display TypeLCD or LED

Description
🌟 Control Your Climate, Elevate Your Craft!
- REAL TIME ALERTS - Stay informed with an alarm system that notifies you of sensor failures or high temperatures.
- DUAL FUNCTIONALITY - Seamlessly switch between heating and cooling outputs for versatile applications.
- VERSATILE APPLICATIONS - Perfect for 3D printers, freezers, fridges, and hatching—adaptable to your needs.
- USER FRIENDLY INTERFACE - Designed to be more intuitive than the STC-1000, making setup a breeze.
- PRECISION AT YOUR FINGERTIPS - Experience unparalleled accuracy with our highly reliable temperature controller.
The Inkbird ITC-1000 is a dual-stage digital temperature switch controller that offers precise temperature management for various applications, including 3D printing, refrigeration, and incubation. With features like a user-friendly interface, real-time alerts for sensor issues, and the ability to control both heating and cooling, it stands out as a reliable choice for professionals seeking accuracy and versatility.


Have a Question? See What Others Asked
Reviews
J**D
Used for hydroponics! Here's a quick how-to for all you non-electical engineers out there (like me!)
I live in Florida and decided during quarantine that I wanted to try growing peppers and onions in my office closet. I've spent the last 4 weeks buying every hydroponic solution I could, trying to figure out why my plants were always closer to dead than alive.I have a small setup -- a 5 gallon bucket of nutrients and a RDWC setup I got off Amazon (https://amzn.to/3acGSqG). Little did I know, with the Florida heat and my small closet space, a RDWC can actually cook your plants because of the water that sits in the hydroponic system when the pump is not running. I needed a way to cool my nutrients without investing in a 400$ water chiller meant for (much) bigger grow ops.I read all of the reviews on a small water cooler that would help keep my solution temperatures under control (https://amzn.to/2VcaBMg) and saw a review from the control engineer saying I needed to forget about an expensive controller buy a simple 18$ one -- this one! (review is here for reference https://www.amazon.com/gp/customer-reviews/R3C88YUKT446KA/ref=cm_cr_arp_d_rvw_ttl?ie=UTF8&ASIN=B001JSVLBO). Well that was a stupid idea -- that guy knows way more than I do. If you're reading this now and you need a controller, spend an extra 15$ and buy this (https://amzn.to/34EnDVH). However, if you like to get in over your head like me, keep reading.You'll need a few items from your local hardware store --1. A 1-1/4" hole saw (https://amzn.to/2xnu5o7). You'll need this to drill a hole in whatever tank is holding your nutrient solution.2. A generic wall outlet -- something like this (https://amzn.to/3bcOYkd)3. A 3 prong extension cord, you know, the usual kind (https://amzn.to/2K4ImbZ)4. If you have an extra computer power plug laying around, that should be fine. Otherwise you can use a lamp cord. I used something like this (https://amzn.to/2K7GLSH)5. Finally, a place to put it all, nice and neat. I used something like this, but I took my controller to the hardware store and found one that was a snug fit (https://amzn.to/3bdfw56)6. (optional) an outlet cover, 'cause we're fancy and like aesthetics.Time to put it together!1. Cut the tail off the computer power cord (or similar) mentioned in the part list -- #4. The tail being the part that does not plug into the wall (the female end, cut it off). Pull the casing back a bit and strip the black (hot wire) and white (neutral). Leave the green alone, cut it so that its just the two black and white wires exposed. Put some electrical tape over it for good measure.2. Strip the black and white wires and connect them to the controller by first unscrewing the screws in the terminals. Black (hot) goes into port 1 (closest to the left when looking at the back), the white (neutral) goes into port 2. Screw the screws tight to secure the wires.3. Connect the controller's sensor wire to ports 3 and 4 -- the order does not matter.4. Plug in the power cable connected to the controller and make sure it powers on.5. If all is well, it should startup and show you what the ambient temperature is. Disconnect the power cable afterwards.6. Take your extension cord (part #3) and cut the tail off (female part). Then cut an additional 6-8 inches from that -- we'll need a bit of copper wire for the next steps. Set it aside.7. Grab the mutilated extension cord -- the one with the male plug remaining. Strip all 3 wires -- white, green, black back a bit. Connect the white wire to the neutral screw (mine was silver). The green wire goes to the green screw. Connect the black wire (hot, power) to the temperature controller, terminal #7. At this point you should have: the power cord (section with the male end) connected to the electrical outlet via the white and green wires. The power cord's black wire should be connected to the controller port #7.8. Remember that piece we cut off in step #6? Grab that, pull the black wire out of the casing, and strip both ends. Plug one end into the controller terminal #8, and the other side of that wire goes now to the brass screw on the new outlet (the one that has the green and white wires connected). At this point you should have 3 wires connected to the outlet, green and white directly from the extension cord, and black coming from the controller.9. Make it look pretty! I'll leave this up to you. Make sure to cover any exposed wires with electrical tape.10. Finally -- you should have three plugs now -- one from the aquarium chiller, one from the extension cord, and one that power the controller. Plug the aquarium chiller plug into the new outlet. Plug the other two cables into a standard wall outlet that has power.11. Mount the chiller to your bucket, inserting the probe through the hole and tightly securing it with a wrench. Check for leaks!Congratulations, you're a boss. Go out there and grow!
E**0
Accurate temp control, good price.
I have had this for 4 years and it still works great. Easy to setup, very accurate temperature control. I use it to control a full size refrigerator with a heating pad inside for fermentation of beer, wine, and mead. I just bought a second one.
T**M
Perfect for beginner sous vide
I use this as a temperature controller when cooking sous vide with my crockpot. If you are just getting into sous vide, this is a very economical and easy way to get started. I've been using it successfully for months.A few notes for the beginning user:- This unit shows temperature in celsius, but there's a fahrenheit version available- This is a simple on-off controller. It doesn't have fancy logic that learns the heat responsiveness of your crockpot over time in order to more precisely maintain temperature. As a result, it tends to overshoot the target temperature by about 2 degrees due to the fact that the heating element doesn't cool down instantaneously after it's deactivated at the target temperature, and therefore continues to transfer heat into the water volume. This has never been a problem for me but is something to consider if you need extremely sensitive temperature maintenance. To compensate for this, I tend to set the temperature about 1.5 degrees C below the actual target, and the temperature typically will rise to about 0.5 degrees above target and then maintain there for a long time thanks to the water volume in the crockpot. This works well for me.- It has the ability to engage both heating and cooling circuits. I don't use this for sous vide so I simply don't wire anything to the cooling circuits.A NOTE ON THE WIRINGI never know what to think when I read anonymous internet comments about how easy or hard something is to wire. I'm not very mechanically or electrically inclined, and this was a bit of a challenge for me. You can't just plug in your appliances (and can't just plug this controller into the wall, for that matter). You actually have to wire this up to get it working.You can find wiring diagrams online, but in a nutshell what I did is to cut up an extension cord and wire the various ends in as follows:- The live ("hot") wire goes from the wall plug (male part of extension cord) into terminal 1 (this is just to power the controller)- Connect this wire to terminal 7- Connect the live wire from the socket side (female part of extension cord) to terminal 8. You will then plug your appliance into this socket. The way the controller works is that, when it needs to activate the heating circuit, it internally connects terminals 7 and 8, thus sending power to the socket. When it needs to deactivate, it breaks the circuit. This is why you can hear a click as it turns on and off.- Connect the other wire from the socket end to terminal 2- Connect the other wire from the wall end also to terminal 2OPERATIONThis controller has some other options that reviewers have already covered. Setting the temperature is pretty easy but the process is easy to forget - in particular the fact that you have to press the power button to lock in the temperature after setting it. I would write these down and tape them to the top of the unit. To set the temperature, what you do is:1. Hold down the S button until it goes into function mode2. The up and down buttons now let you select between different functions. F1 sets the temperature.3. To set the temperature, while F1 is showing, again hold down the S button and then use the up and down buttons to raise or lower the temperature. It's a little unwieldy and you need two hands.4. Release the S button when you have the right temperature showing.5. Press the power button to lock in the temperature.You use the same procedure for the other functions, which control things like the point above/below the target temperature at which you want the heating or cooling circuits to activate, and whether you want the cooling circuit to activate after a delay (helps extend the life of compressors).For bonus points, you can put all your wiring into some sort of box, and only expose the front control panel and the socket for plugging in your appliance, which makes things a lot neater.
Common Questions
Trustpilot
1 month ago
5 days ago
