🏡 Elevate Your Outdoor Storage Game!
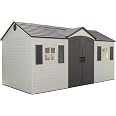
The Lifetime 6446 Outdoor Storage Shed is a robust and stylish solution for all your outdoor storage needs. Measuring 8 x 15 feet, it features 6 skylights, lockable steel-reinforced doors, and a durable construction that withstands the elements. With ample shelving and a high-pitched roof for efficient drainage, this shed combines functionality with aesthetic appeal, making it a must-have for any outdoor space.


| Door Width | 96 Inches |
| Door Height | 94.8 Inches |
| Chamber Depth | 72 Inches |
| Chamber Height | 94.8 Inches |
| Item Dimensions D x W x H | 180"D x 96"W x 94.8"H |
| Item Weight | 314 Grams |
| Style | Garden,Lockable,Outdoor |
| Door Style | Sliding Doors |
| Color | Desert Sand |
| Top Material Type | Plastic |
| Frame Material | Alloy Steel |
| Base Material | High Density Polyethylene |
| Material Type | Plastic, Metal |
| Is Assembly Required | Yes |
| Ultraviolet Light Protection | uv |
| Water Resistance Level | Water Resistant |
T**M
Great Shed for Hard to Reach Places
As with every household, we needed more storage space. Our 3 bedroom bi-level is busting at the seems and our wooden shed (delivered on a flatbed truck) was full too. So it was time for another shed. I looked at a lot of different options but the biggest stumbling block I had was how I was going to get the shed where I wanted it.I needed the shed to be in the back yard. The yard is accessible by small truck but my septic system is in the way for a flatbed to come in. I thought about building one from scratch but with the time for labor and money for materials, it just didn't make sense. I looked at the wooden shed kits from Lowe's and Home Depot but they are really not made all that well (for a wood shed).I reluctantly decided to look at the "plastic" Lifetime sheds. I first thought how good could they be, after all they're made of plastic! My local Lowe's had one and I was surprised how well it was made. The kit is designed so that when it's all together, it's actually pretty solid.Amazon had the 15'x8' foot shed for about the same price the big stores were selling it for. I could have ordered one from Lowe's and had it delivered or picked it up with my truck, but it's pretty heavy. I noticed this shed was Amazon Prime eligible (which I have) and thought how could they possibly ship this thing in 2 days to my house for free. Guess what, they did!I couldn't believe it. A trucking company contacted me to set up a delivery time and a day later they were backing down my driveway.The free, speedy shipping was great, I was however a little annoyed that the trucking company came with only the driver and a dolly. I had to help him offload the shed from his truck at the end of my driveway. So do you think I would get workman's comp if I blew my back unloading it from their truck? ;)I unpacked the boxes one at a time, loaded the parts in my pickup truck and drove around back to the construction site. Easy, easy!Assembly was fairly easy. Some of the directions were a little confusing but if you take your time you can figure it out. This is DEFINITELY a two man(woman to be pc ;) job. You need someone to hold and someone to fasten. My dad and I had the entire shed together in a long 8-9 hour day. I did have to go back the next day to do some finishing touches like slip in the plexi windows and attach the shutters but that took all of 30 minutes.One very important note! The base for the shed needs to be perfectly flat and level. Almost flat or slightly off isn't going to cut it. The included plastic floor of the shed is the base for the entire structure. The wall panels interlock with each other and snap into tabs in the floor. You need quite a bit of pressure and persuasion to get the tabs locked in. Once in though it's a pretty solid structure.In a perfect world you would want to have a concrete base poured that was perfectly level, but for a shed this size at a minimum of 4" thick, that's a lot of concrete. I would not suggest mixing it by hand, the way to go is bring in a truck to pour it. For me concrete wasn't an option because of where it was located.Instead I got a load of QP (Quarry Process) which is basically 3/4" stone with stone dust mixed in that compacts really nicely. They use this stuff for driveways and for retaining wall bases. The secret is you need to spread it in thin layers compacting each layer as you go until you reach a 4" thick base (spraying each layer with water first and then compacting is better). This is a nice solid base that if done properly will never move or frost heave.The QP cost about $160 delivered and you can rent a gas powered compactor for about $50 - $75 per day (which I would recommend. Doing it with a hand compactor is hard work).You could put the shed directly on the QP base but I went one step further and built a wooden base.Back to Lowe's for some pressure treated 2"x4"s and pressure treated plywood. I bought 2 - 16' 2x4s for the front and back and then 8' 2x4s for the sides and in-between. I built the base as if I were building a wall. I cut 3" off the 8' 2x4s and spaced them 16" on center. I actually used 4 saw horses (one on each corner) to make building the base a little easier on the knees. Once built we placed it on the QP base, squared everything up and then dropped 4'x8' full sheets of plywood and screwed down with gray coated deck screws. I actually built my base to be just slightly larger than the base of the shed so I had to cut the last piece of plywood. To make your job easier you could just leave it as a full piece making your overall base dimension 16'w x 8'd.If I had to do the base over again I would probably place the 2x4s 12" on center rather than 16" to give it a little more strength. The floor flexes a little when you walk on it and especially once you start loading it down with heavy stuff. I might also consider using 2x6s for the base structure for added strength.The 2x4s, plywood and screws cost about $200My biggest complaint about the shed itself is the roof panels. The front peak was a real P.I.A. to put together and the panels didn't line up perfectly. I don't think I'm going to have leaking problems but there are a few small gaps. The alignment of the doors is another issue and why it's so important to have a level base. If the base is off even a little bit from left edge to right edge, the doors won't meet properly in the middle. You'll need to shim and tweak to get everything to ling up. Speaking of the doors, the inside door latch barely works (again because of alignment issues) so invest in a good waterproof combination lock ($14 from Lowe's :), to prevent the doors from coming open and of course to help protect your stuff.Even with these few little quirks, I'll give the shed a 5 star as the most bang for the buck.
D**M
Living in one of these under an overpass in Burbank.
I bought three of these for various storage requirements, and I have a couple comments. Assembly of these units causes you to question your life choices. It makes being at work on a bad day look like a party. Thinking about assembling one of these units, is like thinking about an IRS audit when you’re having a colitis outbreak. Your mother-in-law could come over and you would like that better than assembling these units.However, they are amazing, the quality is good, engineering is even better. I am very happy with my purchase. But I am unhappy with my life right now having to assemble two more.A keynote is that the deck you build has to be level. If it bows or sags, the pieces are not going to go in together when you put the walls up. So make sure that your deck is level! Besides that, layout all the pieces and be sure to read the directions. You should find someone to read the directions and make these assemblies who is Patient, and did I mention Patient. If it was just me, I would’ve kicked everything into a giant tornado heap.
S**
Wonderful Leak Proof Shed!
Absolutely love it! :) If the directions were better I would have given it 5 stars. The shed itself is definitely 5 stars though!I wanted to post some helpful hints that aren't included in the directions, but should be.1. First, the directions were likely written by a man who knew exactly what was supposed to be done and didn't feel it necessary to explain it to anyone else. Don't feel too badly if you don't get the instructions. It's not you! Also they are about 80 some pages held together by a single staple,which doesn't help, so if you have the time, a three ring binder would be a vast improvement2. Sub Floor. I used the directions in the manual. I did the wooden subfloor. You do have to put the boards every foot. I tried to take a shortcut and do every two feet, but it didn't work. Every foot or you will have an extremely weak subfloor. Get it as level as possible. It will never be perfectly level since it's not concrete, but you can get pretty close.3. The "Interlocking" floor boards. Two person job, only because with the 15x8 shed the floor panels are really long. If you can't get a few to interlock completely don't panic. It will work itself out. The best thing to do is move on and stay calm.4. The Wall. This can be done with one person, if you are like me and prefer to work on your own. If you do better in a group than you may want another person. Here's how it works. Stick the wall in the tab and shove it as far as you can to the left. Then grab your hammer or mallet and using the wooden block that comes in the hardware box, place the wood block along the side of your wall panel toward the bottom of the panel. Pound the living daylights out of it until it won't slide any farther to the left. It's easy, but the directions don't tell you to do that. Before I figured this out I had assembled and taken apart the walls 4 times. It was not fun and admittedly it had me in tears. Hammer and wood block and lots of pounding worked magic and my walls lined up and there was no need to reassemble them! lastly, the corner pieces are hard to put in. There was one I could not get to click in completely, but just as with the floor boards, move on and don't stress. It will work itself out.5. Trusses. This was relaxing! I got to sit down and move very little. This was one part where the instructions seemed pretty good. Just be sure you are using the right pieces. There will be two trusses with no notches, two with one notch and one that will be a little different and is meant to support the gable.6. Truss installation. These just slide into place. No screws, which I found odd. if you can't get them to fit into the notch use your hammer to pound them into place. I would suggest tying the notched ones into place with some string so they don't fall. You'll see what I mean once you get to that part. Don't install the middle truss until you need it, which won't be until you are ready to install the gable.7. Door assembly. Watch the youtube instructional video. The directions don't tell you much here. I still don't know if I did it right. They look even to me, but I can get them to close completely at the top. I'm thinking that it is an alignment issue somewhere. I'll post an update if I figure out what is wrong. like with the roof trusses with notches, I used some string to hold them in place until I was ready to put the gable on. They won't stand by themselves without the gable, but you need them up to install the gable. It's not the greatest design I think, but it apparently works for other people.8. Roof Panels. There is nothing difficult to understand here, but two people are necessary. you need someone to push on the outside to line the holes up so you can put the screws into place. If you're doing all that and they are still not lining up, look at your truss. If the edge is sticking out, pound it in until it's even with the outside of the wall and try again. The holes should line up now.9. Top Roof Panels. These are smaller and they just screw into place. We had problems with the middle one, but my husband was able to line it up so now it's okay.10. Skylights. By the time you get to the skylights your neck is so sore from looking up and your arms are tired from constantly pushing on things, but don't give up you're almost done! These also just screw into place. Since we had trouble with the middle top roof panel we also had trouble getting the middle skylight to snap into place. What I did was use a longer screw than the one they gave me. about an inch and a quarter. The extra length made it easier to get it into the hole and then it lined up without a problem.11. Shutters. Don't drill holes in your shed. Why they don't have pre drilled holes already is anyone's guess. I tried this with one, but just being off by a teeny tiny bit made it not work at all. So instead I went and got some outdoor glue and I'm going to see if that will work. You can also just leave them off.Other notes... The parts labeling makes no sense. they label the bags that the hardware is in and then the parts have mythical made up names that don't correlate with what is inside the bag. Just look at the picture and do the best you can. Once you get to the roof they don't really tell you what screws to use, but it is the same as the ones you used on the walls.It is leakproof! Just had a huge rainstorm and I stood inside of it and no leaking! Even with the alignment issues we had with the roof.Very please and very happy. :)4. The Wall
Trustpilot
1 day ago
2 months ago